- Published on
Linting and Formatting TypeScript in 2025 - A Complete Guide
- Authors

- Name
- Finn Nannestad
All tools and configurations described in this article are implemented in this demo repository.
If there was a Nitpickers Anonymous support group, I'd be member number one.
Poorly named variables, line breaks in the wrong place, typos, exported constants that are never imported, ternary statements nested within ternary statements, functions with too many arguments - these are the things that keep me up at night.
In case you're thinking "that doesn't seem so bad, those things would bother me too", then I can assure you that for me it goes to a much more pathological level.
If I see a single line comment without a space after the double slash //like this it bothers me. What sort of psychopath doesn't stylise their comments // like this?
God forbid I stumble across someone using a string literal that contains a curly quote like this ’ (Unicode U+2019) instead of a perfectly good straight quote '.
You may imagine that endlessly requesting changes for such tedious trivialities on the pull requests of my colleagues would not be winning me any friends, and you would be right. Thankfully though, modern tooling is effective enough that most of the time I don't have to.
In this article I will outline what linting and formatting tools are must-haves in your TypeScript projects, covering:
- EditorConfig
- Prettier
- ESLint
- Knip
- tsconfig (not exactly a tool, however has powerful settings that warrant mentioning)
And finally, I will share how to make it as easy as possible for your team to use these tools and how to enforce the rules, through:
- Visual Studio Code recommended extensions and settings
- Pre-commit hooks
- GitHub workflows and repository settings
Please note that apart from the section on tsconfig, and a few of the ESLint plugins I reference, everything in this article also applies to projects using JavaScript.
- EditorConfig
- Prettier
- ESLint
- Knip
- tsconfig
- How do we enforce all of this?
- Footnote - Was this even worth it?
EditorConfig
The EditorConfig project defines a file format that specifies coding styles that your IDE of choice will adhere to, either natively or with the addition of a plugin depending on your editor of choice.
Although formatters like the Prettier have wide support for different file types, there will inevitably crop up an instance in your codebase at some point which is not supported (common examples are files without extensions, e.g., Makefile), so having an editor-level formatter which supports all text-based files will help maintain consistency for these edge cases.
Configure EditorConfig by creating a file .editorconfig at the top level of your project.
Here is the setup I use. Tweak it based on your personal taste:
# Top-most EditorConfig file
root = true

[*]
end_of_line = lf # Unix-style newlines
insert_final_newline = true # Newline ending every file
trim_trailing_whitespace = true # Trim whitespace preceding newlines
charset = utf-8 # Enforce consistent character set
indent_style = tab # Matter of taste
tab_width = 4 # Number of columns used to represent a tab character
When an inevitable exception comes up where you have a particular file type that needs to be formatted differently, you can simply override your [*] config for that type. For example:
# In the same file as above, below the definition for [*]
[*.{yaml,yml}]
tab_width = 2
Note that Prettier automatically adopts the values specified in an .editorconfig file for tab_width, indent_style and end_of_line unless overridden.
Prettier
It might be reasonable to ask, "Why, in a world where ESLint has become so powerful, is there even a need for formatting tools like Prettier anymore?"
Unfortunately for those of us hoping to slim down our number of dev-dependencies by one, ESLint is very much not intended to be used for formatting, to the point where the team has deprecated all formatting rules and recommends using a dedicated code-formatter instead.
Prettier is simple and fast, and is worth using in any JavaScript/TypeScript project. Install it with:
yarn add --dev prettier
Prettier can be used with its out-of-the-box defaults and, as mentioned above, will inherit settings from .editorconfig. It is important not to override these to different values in your Prettier config file to avoid conflicts.
If you want to customise it further, you can create a .prettierrc file at the top level of your project. Here is the configuration I use:
{
	"semi": false,
	"trailingComma": "none",
	"quoteProps": "consistent",
	"printWidth": 80
}
Based on your preference, there are many further options which you can read about here. It is worth familiarising yourself with these options before working on your ESLint config. Your rule of thumb should be "If Prettier can do it, then don't use ESLint".
Some common examples are enforcing standards about usage of single vs double quotes or ending lines with semicolons. These are jobs best left for Prettier.
If you want to avoid running prettier against specific files or paths, you can add them to a .prettierignore file.
ESLint
ESLint configuration is verbose, so I won't provide complete examples in this section. For exact syntax, check out the ESLint config in the demo repository which contains all configuration talked through here. Note that I have used TypeScript, which requires adding jiti to dev-dependencies.
ESLint is the most powerful static analysis tool we have at our disposal for JavaScript and TypeScript code, thanks a lot to its massive suite of native and third-party rules and plugins.
Due to the breadth of these rules it can also be overwhelming to know where to start and what rules you should be turning on. I'll aim to demystify it a little and demonstrate that we can get 99% of the benefit of ESLint with just a handful of plugins, and no complex configuration.
Concepts
ESLint is flexible, but with that flexibility comes complexity. For this article, there are three main concepts to understand:
- Rules - each of these validates that your code meets a certain condition, for example, whether your function has a return type specified. Different rules have different configuration options, and generally can be set to either "warn" or "error". Code breaking the rule will get a zigzaggy underline in your IDE. Some of these are autofixable by running ESLint, but others require manual intervention.
- Plugins - npm modules that contain third party sets of rules and configurations
- Shareable configurations - configurations shared via npm that enable sets of rules built into core ESLint or plugins that you are using
If you're completely new to it, I recommend checking out the ESLint page on core concepts, then returning to this article.
N.B. In 2022 ESLint introduced a new configuration format called "Flat Config". They say it is intended to be "much simpler than the original config system". I'm not sure I agree, however it is a little more flexible and not so bad once we've wrapped our head around it.
Setup
First up, install ESLint:
yarn create @eslint/config
This will also create the ESLint config file eslint.config.mjs.
To install all the plugins and configurations I will be talking through, you can run this command:
yarn add --dev typescript-eslint \
	@stylistic/eslint-plugin \
	eslint-config-prettier \
	eslint-plugin-react \
	eslint-plugin-react-hooks \
	eslint-plugin-react-refresh \
	eslint-plugin-spellcheck \
	eslint-plugin-react-prefer-function-component
Recommended configuration
Both core ESLint and most plugins have a large number of rules and it can be quite overwhelming to decide which to enable. Thankfully, most of the time they also come with shareable configurations which are often "recommended" sets of rules. These are rules that are desirable for the vast majority of projects, and can be turned on without needing to specify each rule individually.
N.B. If you're already using a framework that has an ESLint configuration generated by default, it is possible you are using some of these without realising. For example, if you create a NextJS project with ESLint, it will automatically add eslint-config-next, which includes eslint-plugin-react and eslint-plugin-react-hooks by default. Do your research to avoid duplication.
typescript-eslint
typescript-eslint is the primary library we will be using to lint our TypeScript code and I recommend applying multiple configurations:
- eslint-recommended - This is the full set of regular core ESLint recommended rules with a few disabled that are handled automatically by TypeScript. These are rules that basically always identify bad practices or bugs.
- strict-type-checked - Includes all
recommendedandstrictrules from TypeScript ESLint, along with additional ones requiring TypeScript type checking information. - stylistic-type-checked - Applies rules considered best practise for TypeScript projects that don't impact logic. Generally just enforcing cleaner code.
The last two rules have a big asterisk against them - enabling rules that require type information heavily impacts ESLint performance to the point where it may be impractical to use on large codebases. I have seen these increasing execution time 30-fold.
If your codebase falls into this category, strict-type-checked can be swapped out for strict, and stylistic-type-checked can be swapped out for stylistic.
@stylistic/eslint-plugin
I mentioned in the section on Prettier that we shouldn't use ESLint for formatting, however I partially lied. ESLint Stylistic has replaced the now-deprecated formatting ESLint rules and I strongly recommend using its recommended configuration. Prettier is great for our fundamental formatting, however doesn't go remotely as deep as ESLint can. Stylistic's many rules will make your code sexy.
eslint-config-prettier
This one is simple. It turns off all ESLint rules that conflict with Prettier.
N.B. You may also find references to something called eslint-plugin-prettier. This is not recommended to be used by Prettier
eslint-plugin-react, eslint-plugin-react-hooks and eslint-plugin-react-refresh
If you're not working with React, swap these out for equivalents that doubtlessly exist for your framework of choice, however these are the most useful plugins if you are. The first two are self-explanatory. eslint-plugin-react-refresh will report any case where a component is structured in a way that will break fast refreshing. Use the recommended config for each of these.
Each of these have recommended configurations that should be applied.
eslint-plugin-spellcheck and eslint-plugin-react-prefer-function-component
These are some very specific oddballs which are not mandatory, but are personally ones I would include in any project. They demonstrate just how broad the ESLint ecosystem is. In fact, in the introduction of this blog I mentioned my distaste for Unicode U+2019 quotes - there is even an ESLint plugin for that!
Customising rules beyond recommended configurations
Depending on your taste, you might find that recommended configurations go too far, or not far enough. If that is the case, you can customise specific rules.
For example, for the above configurations I personally go a bit further and customise with the following (syntax is well documented on ESLint's or the respective plugin's websites):
"spaced-comment": ["error", "always", { markers: ["/"] }],
"no-unneeded-ternary": "error",
"prefer-const": "error",
"max-params": ["error", 5],
"no-duplicate-imports": "error",
"no-self-compare": "error",
"no-template-curly-in-string": "error",
"no-useless-assignment": "error",
"no-useless-rename": "error",
"no-nested-ternary": "error",
"curly": "error",
"default-case-last": "error",
"default-param-last": "error",
"eqeqeq": "error",
"prefer-template": "error",
"react/jsx-curly-brace-presence": ["error", { props: "never", children: "never" }],
"react/jsx-fragments": ["error", "syntax"],
"react/jsx-no-useless-fragment": ["error", { allowExpressions: true }],
"react/jsx-newline": ["error", { prevent: true }],
"react/self-closing-comp": "error"
If there is a rule you don't like, you can usually disable it by setting the value to "off", for example:
"@typescript-eslint/no-unsafe-assignment": "off",
In rare scenarios where a rule doesn't exist it is even possible to write custom rules.
"warn" or "error"?
I strongly recommend to add every rule with "error" severity so that when they are broken ESLint will end with exit code 1, which can be used to fail builds in your CI pipeline (more on this below). "warn" rules are guaranteed to be ignored by some team member eventually. The only case I would ever use "warn" is if I am turning on a rule for a codebase that violates it a lot already, and the effort to remediate all instances would be impractical.
Knip
Probably the least known tool out of all that I am covering, however I can't overemphasise how much I love it. While ESLint is great at helping you identify and resolve problematic patterns within files, it is not so useful for catching issues that require looking across multiple files, or even dependencies. This is where Knip comes in.
The Knip documentation has a very good overview of why to use this tool, but for me the two most important things are:
- Identification of dead code (very importantly, this includes exported code which is never imported anywhere)
- Identification of unused dependencies
Knip will run without any config file, however depending on the structure and the sort of dependencies you have in your project, it may come up with some false flags, or fail to identify some legitimate issues, in which case we need to tinker with it a little bit.
We can do this by adding an .knip.jsonc file at the top level of our repository. Here is an example where we are ignoring a file and dependency which Knip has falsely flagged as unused:
{
	"$schema": "https://unpkg.com/knip@5/schema.json",
	"ignore": ["contentlayer.config.ts"],
	"ignoreDependencies": ["@svgr/webpack"]
}
tsconfig
This doesn't fall perfectly into the category of "linting and formatting tools", but there are a few type-checking configuration options for the TypeScript compiler that are simply too powerful not to mention, both from a code-cleanliness and reduced-risk-of-bugs perspective.
The easiest way to get your configuration into shipshape is to go and add everything marked as "Recommended" in TypeScript's documentation. There are a few, however, worth drawing extra attention to.
The absolute number one setting that you should turn on is strict: true, which enables all of
alwaysStrictstrictNullChecksstrictBindCallApplystrictBuiltinIteratorReturnstrictFunctionTypesstrictPropertyInitializationnoImplicitAnynoImplicitThisuseUnknownInCatchVariables
Special emphasis on strictNullChecks. If you don't like seeing crashes with the message Uncaught TypeError: Cannot read properties of undefined, this is the option for you.
A few more rules that are valuable for cleaner code are:
allowUnreachableCode(asfalse)noUnusedLocalsnoUnusedParameters
How do we enforce all of this?
Having handy-dandy linters and formatters is all well and good, but if we are relying on simply trusting our team to remember to manually run some commands locally before committing, we're in for sore disappointment.
Sometimes mistakes happen.
Sometimes new starters join who don't know what scripts to run before committing.
Despite our best efforts to set up all the tooling I've outlined above, we wouldn't reach the end of the day before unformatted and unlinted code makes its way into master.
Thankfully, there are a few strategies we can use to automate execution of our tooling for developers to make their lives easier and to prevent unchecked code from reaching master.
My recommendation is a combination of all three of the following, which I will break down one at a time:
- Recommended IDE extensions and settings that result in autoformatting/linting on save of files
- Pre-commit hooks that run (and where possible autofix) issues prior to committing
- GitHub status checks to fail our build and prevent merging our pull request to master if the above two fail
Recommended IDE extensions and settings
This tip is unfortunately Visual Studio Code specific, and while there is no guarantee that everyone working on your project uses the same IDE, in 2025 VS Code continues to be ubiquitous in the industry.
Making some useful files in a .vscode directory enables us to apply IDE settings that encourage consistency across developers.
.vscode/extensions.json
Here we can add a list of recommended extensions that any developer opening your project will be prompted to install with a dialog that looks like this:
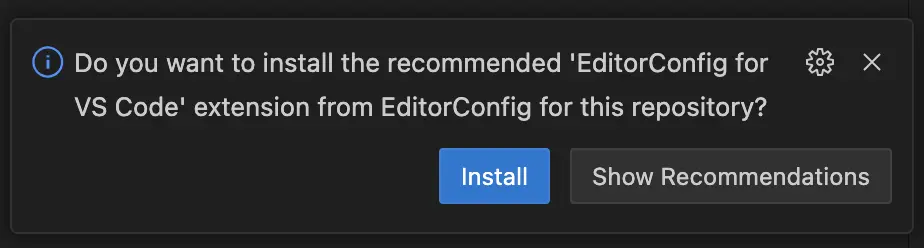
Essential extensions to recommend, if you've followed this article up until now, are:
- EditorConfig for VS Code - overrides user settings with those found in
.editorconfig - Prettier - Code formatter - enables using Prettier as a formatter
- ESLint - integrates ESLint into VS Code
extensions.json syntax for these three looks like this:
{
	"recommendations": [
		"dbaeumer.vscode-eslint",
		"esbenp.prettier-vscode",
		"editorconfig.editorconfig"
	]
}
If you want to add further extensions to recommendations, you can find the correct string value to pass in under a label "Unique Identifier" found on the extension's marketplace page.
.vscode/settings.json
VS Code has two types of settings:
- User Settings - This is your local VS Code configuration that will apply across any project that you open.
- Workspace Settings - This applies just to the current project you have open, and is committed to source control.
We have no control over what our colleagues use for number 1, so number 2, workspace settings, is the important one. To enable automatic running of Prettier and ESLint every time a file is saved, add the following to your workspace settings.json:
{
	"editor.formatOnSave": true,
	"editor.defaultFormatter": "esbenp.prettier-vscode",
	"editor.codeActionsOnSave": {
		"source.fixAll.eslint": "explicit"
	}
}
Pre-commit hooks
If the developer managed to save files without running our formatting and linting tools on them, perhaps because they weren't using VS Code or didn't install the recommended extensions, then the next safeguard in our arsenal is pre-commit hooks. These are simply scripts that automatically run locally on our machine before we commit.
In our case, we will use a very common combination of husky to implement our pre-commit hook and lint-staged to run linters on our staged files.
To get started, we will add the dependencies and initialise husky:
yarn add --dev husky lint-staged
yarn husky init
Now we want to define what lint-staged is actually going to run by adding a new property lint-staged to our package.json. Ideally, it would perform both linting and formatting, which would look something like this:
"lint-staged": {
	"*.+(js|jsx|ts|tsx|json|css|md|mdx)": [
		"prettier --write",
		"eslint --fix"
	]
}
We then want to update .husky/pre-commit (created by yarn husky init) to actually run lint-staged. This is also a time where we could run knip:
yarn lint-staged
yarn knip
Above I said "ideally", as there comes a time when we need to be pragmatic about what we run as a pre-commit hook. A good rule of thumb is that your checks should take no longer than about 10 seconds. Any longer is really going to start annoying developers working on your project. prettier is blazing fast so is always a no-brainer to run, but knip and eslint may need to be culled on larger projects.
GitHub status checks
Even with recommending useful browser extensions and adding pre-commit hooks, you can be certain that some developer at some stage will manage to still bypass our linting.
Maybe a junior on our team had eslint fail in a pre-commit hook script but the error message was confusing. They google it and find that the solution is to just retry the commit with --no-verify. If that sneaks past code review, now we've got unlinted code in master.
This is where our final and 100% foolproof safeguard comes in - running all our checks in a build pipeline and having the result of that build be a GitHub status check which is required to pass before merging our code into master.
How you achieve this is going to be different based on what CI provider you use, but my example will be for those using GitHub Actions.
GitHub workflow
This one is simple. You just want to run all your static checks as build steps. Here is a sample workflow file you can use. Save this in .github/workflows/static-checks.yml:
name: Code Validation

on:
    pull_request:
    workflow_dispatch:

jobs:
    build:
        name: Static Checks
        runs-on: ubuntu-latest
        steps:
            - uses: actions/checkout@v4
            - name: Install modules
              run: yarn
            - name: Lint
              run: yarn lint-nofix
            - name: Prettier
              run: yarn prettier-nofix
            - name: Knip
              run: yarn knip
GitHub repository settings
Next we want to apply some settings to our repository that ensure that only code that passes our Static Checks build can find its way into master.
- Go to repository settings and create a new branch ruleset
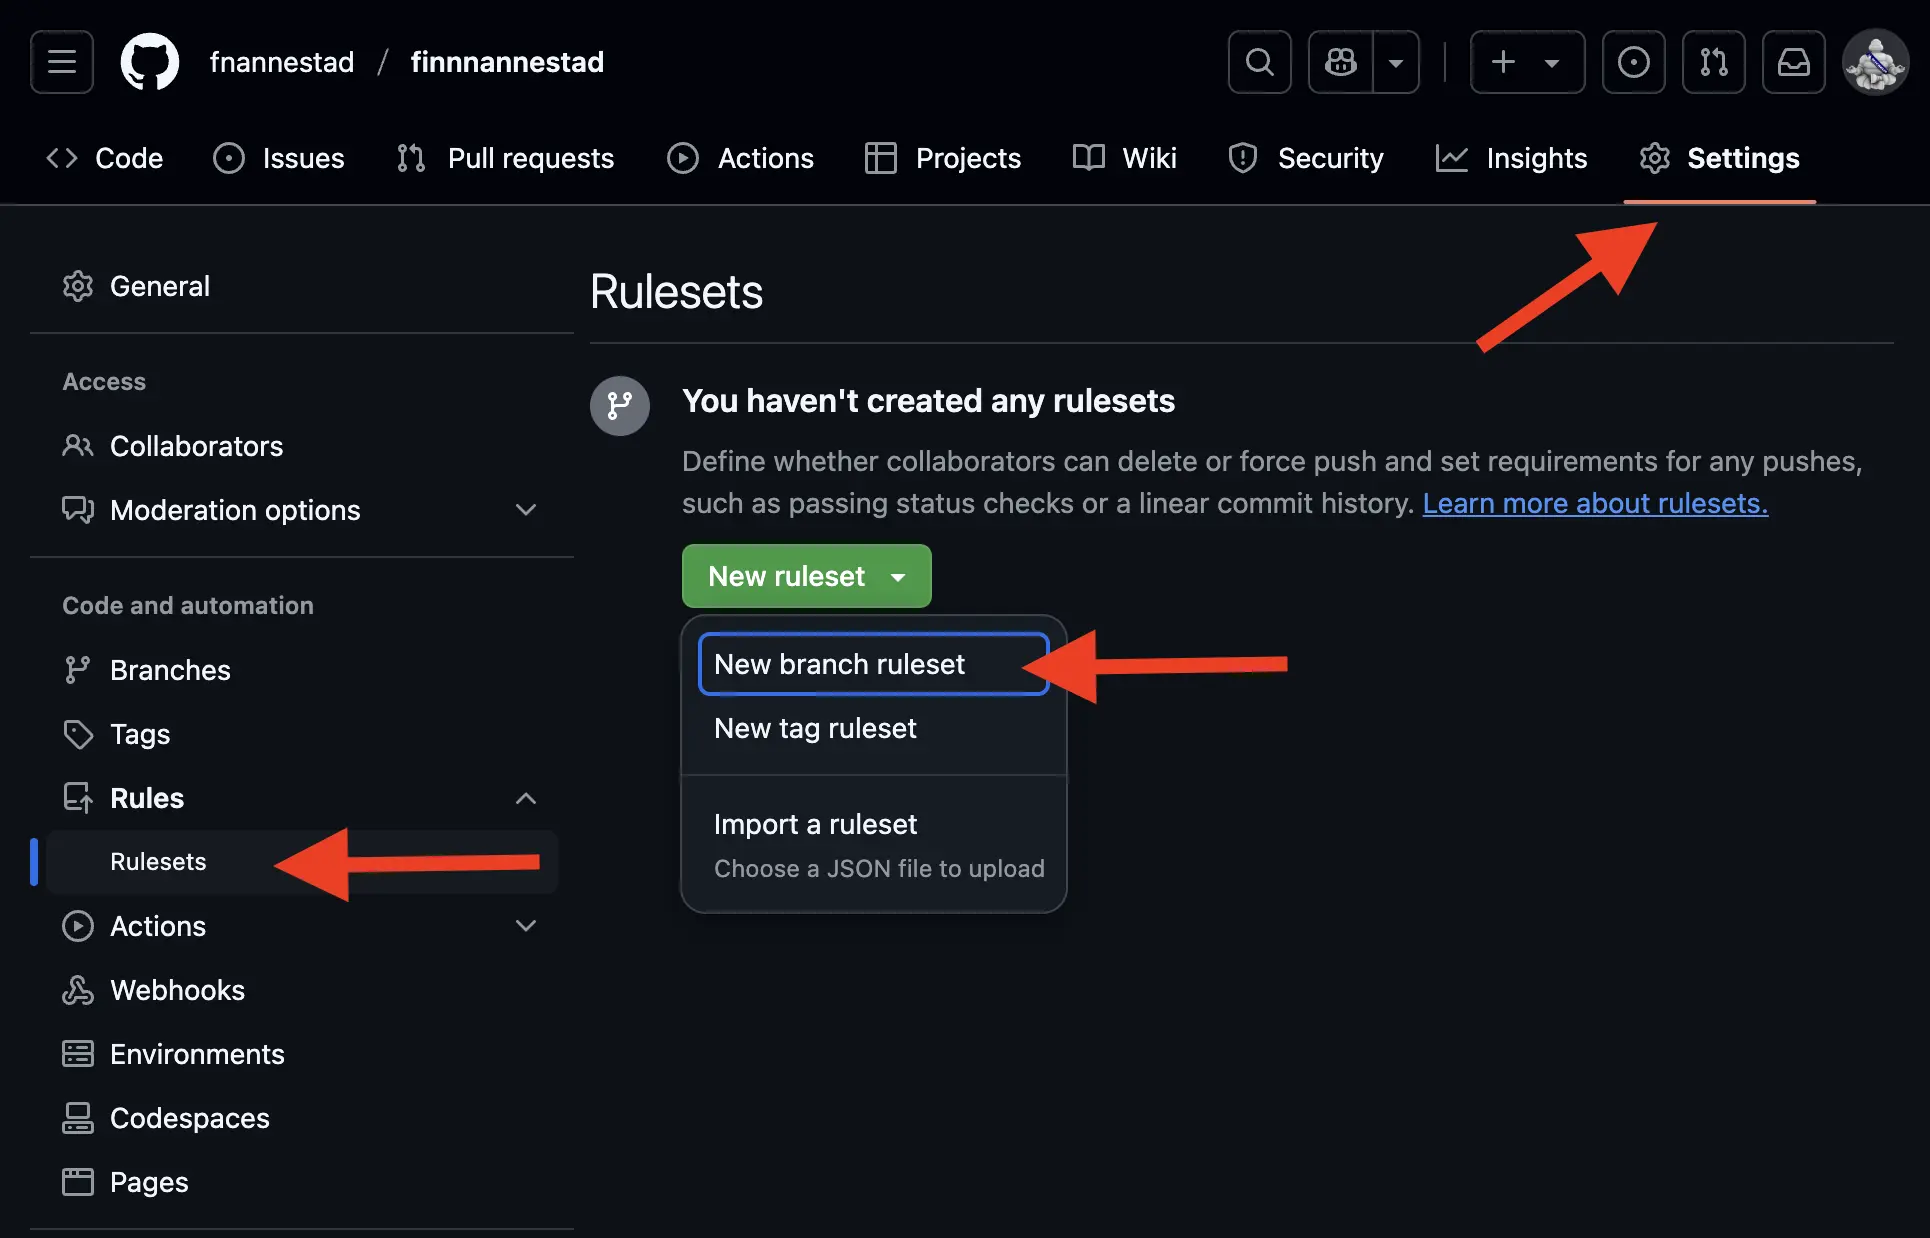
- Name your ruleset (
mainormastershould do the trick) and set the target branch to the default branch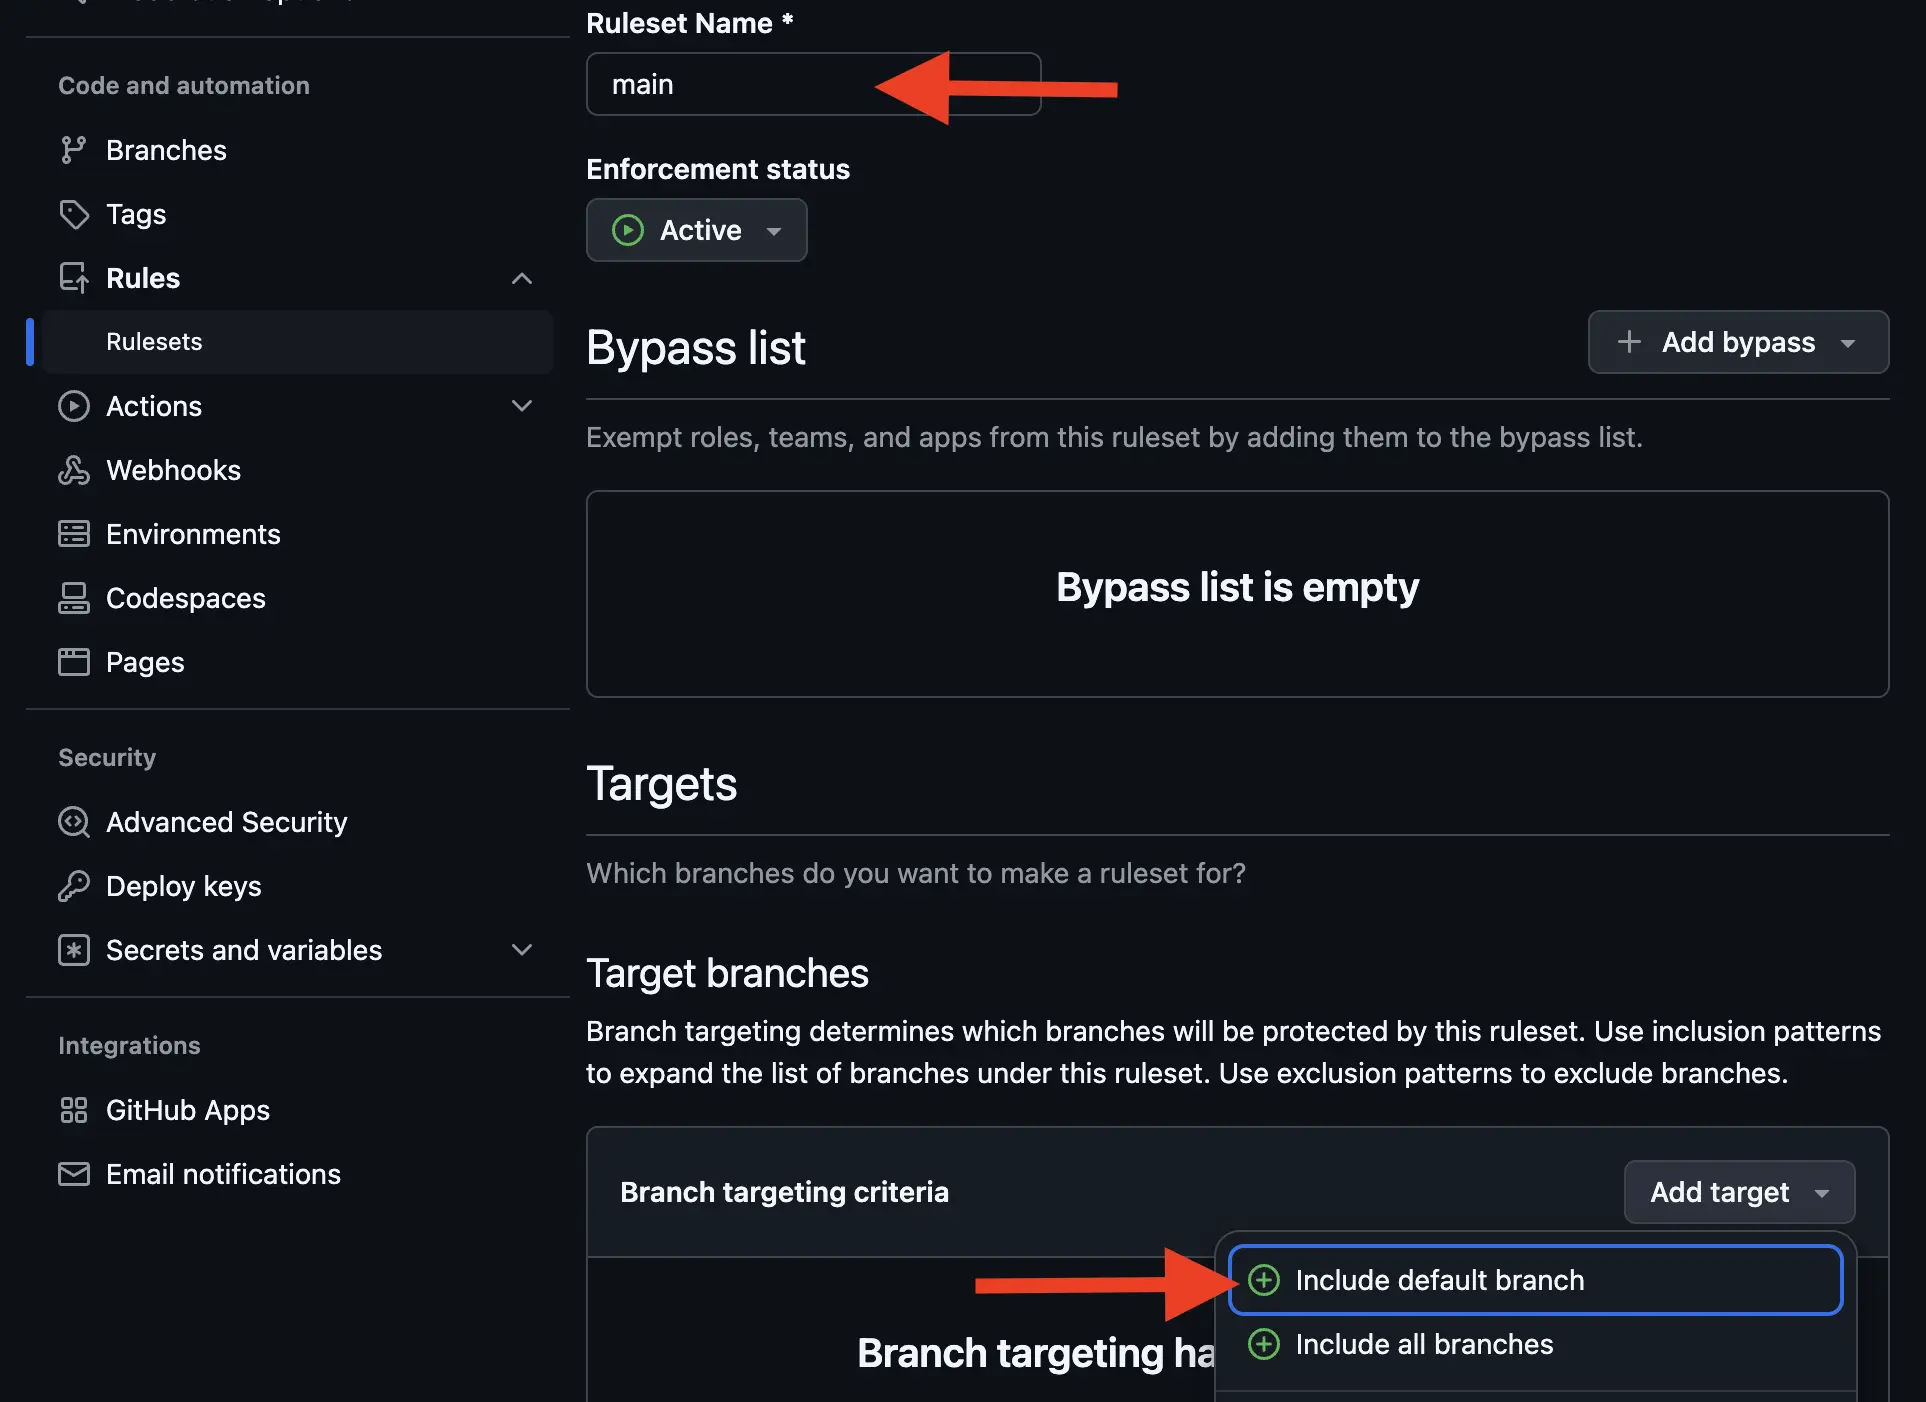
- Under "Branch rules" check "Require a pull request before merging" and "Require status checks to pass" ("Restrict deletions" and "Block force pushes" are selected by default)
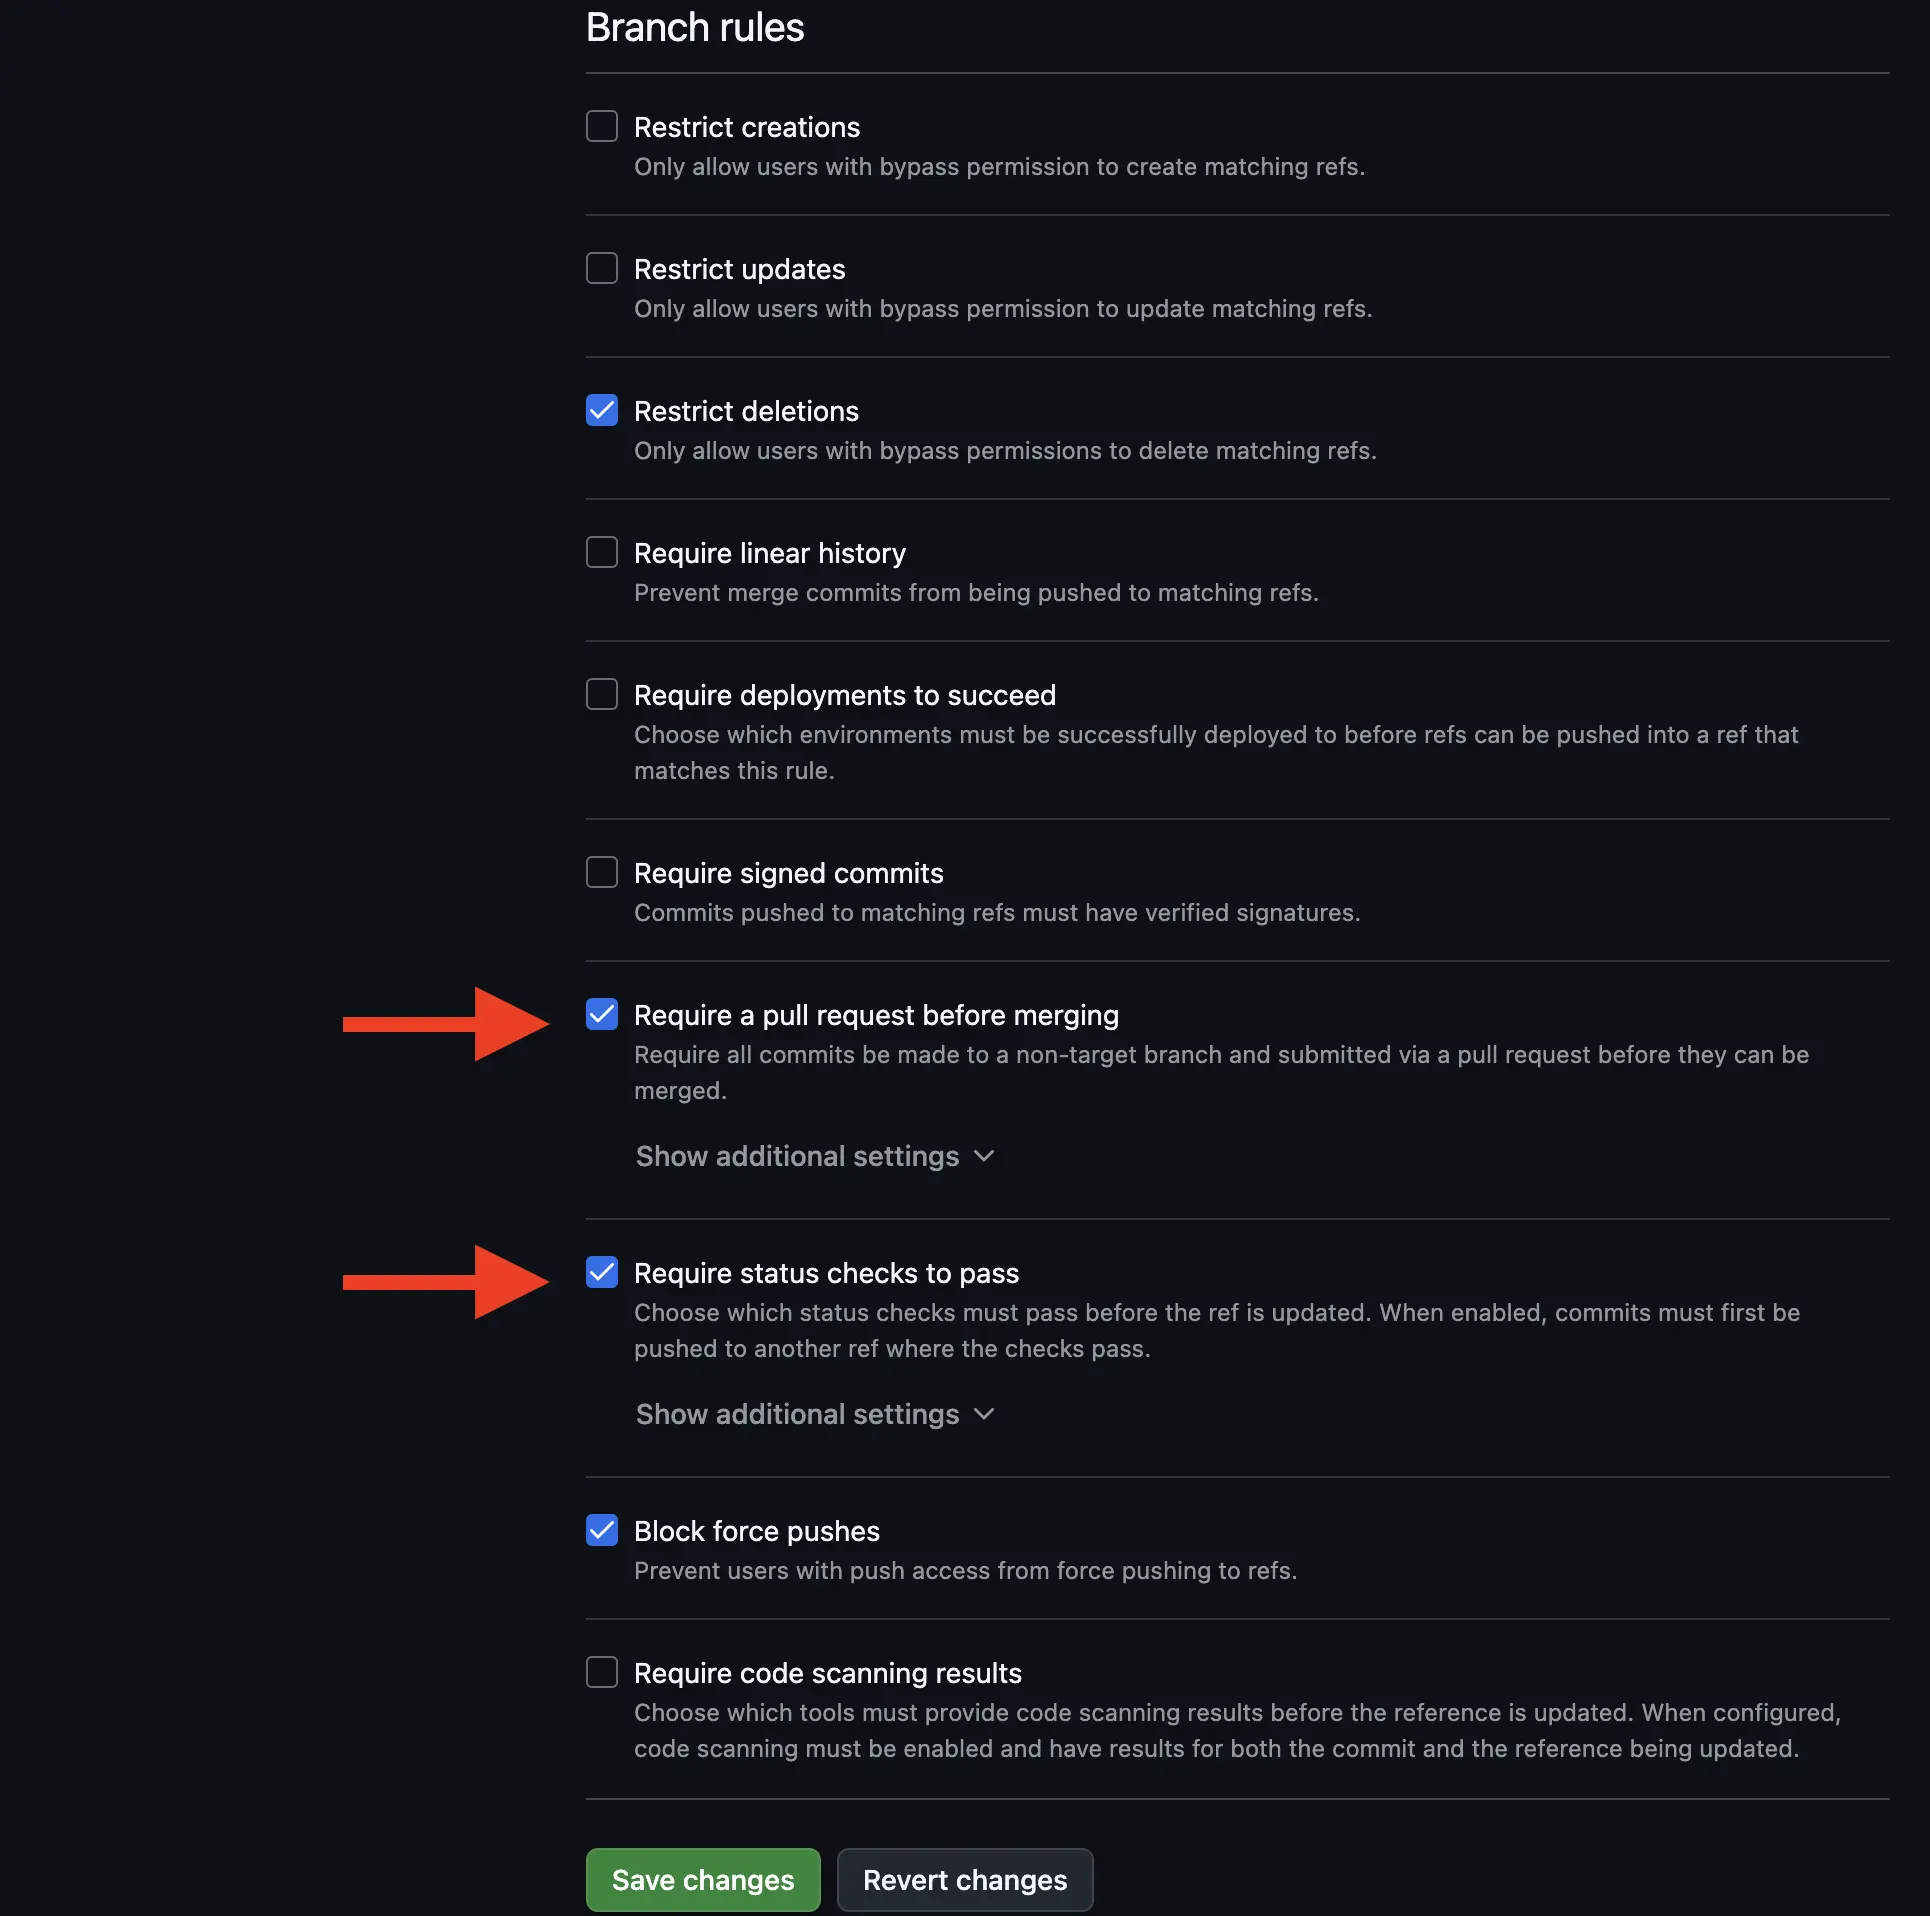
- Expand "Show additional settings" under "Require status checks to pass" and select the "Static Checks" GitHub Action.

- Hit "Save Changes"
Now that we have made it so that:
- No one can commit directly to
masterwithout a pull request - Our new status check must pass to merge a pull request
The next time someone raises a pull request that doesn't pass our checks, they will see a UI that looks like this (sample in demo repository):
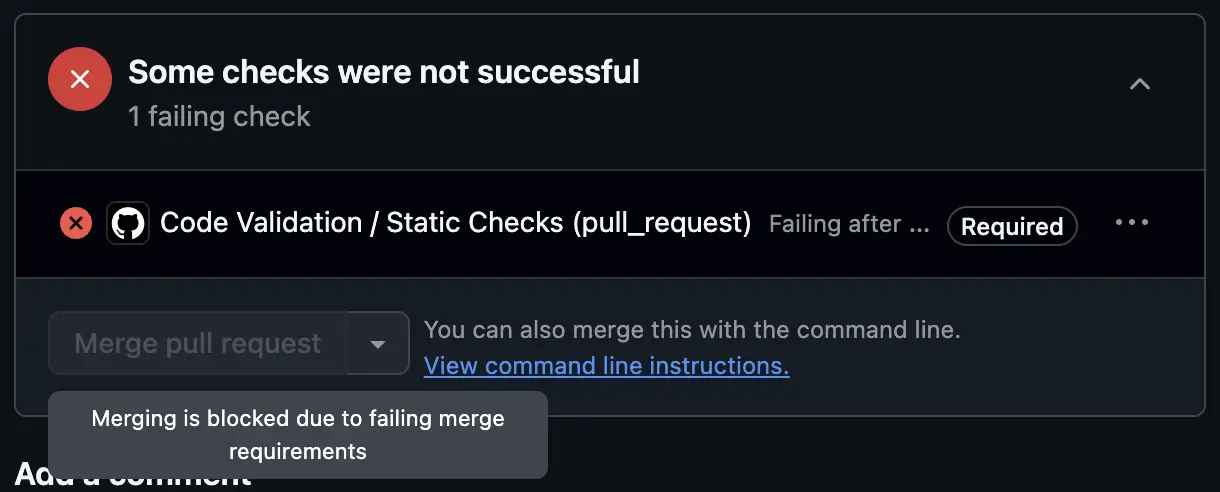
Voila! That's it!
While unfortunately there isn't yet a complete antidote to the spectre of "bad code", we've now applied tooling and settings that will help (and force when necessary) our team to write code as readable, consistent and bug free as possible.
Footnote - Was this even worth it?
Rattling off what you might find elsewhere online would result in me saying that automated linting and formatting:
- Reduces the risk of bugs
- Improves the readability of our code
- Aids onboarding new-starters (who no longer need to read a lengthy style guide and can just let the tooling figure it out for them)
Obvious though they are, each of these alone is reason enough to spend 30 minutes setting up some of the tooling I've talked about in this article.
However I'd like to add two more reasons:
Avoiding bikeshedding
In 1957 C. Northcote Parkinson spoke of a concept which has since become known as Parkinson's Law of Triviality, which proposes that the amount of time we tend to spend discussing a problem is inversely proportional to the importance of the problem.
Parkinson wrote of a fictional committee that, while their task was to review plans for a nuclear power plant, spent the majority of their time debating trivialities like what materials to build the staff bike shed from.
The psychological phenomenon that this is intended to illustrate is that in group settings the amount of time spent discussing a topic is inversely proportional to its importance.
Something very complex, in this example a nuclear power plant, has a barrier to entry of discussion such that only a small group can contribute. A more easy-to-grasp matter like bike shed construction, however, permits everyone to have an opinion.
This law has given rise to the verb "bikeshedding" - the act of spending inordinate amounts of time and energy debating marginal issues.
Anyone working as a software developer should recognise what I'm describing here. Tabs vs spaces. Single quotes vs double quotes. Semicolons vs no semicolons. camelCase vs snake_case.
A development team I worked with once spent a good half a day heatedly debating whether to style our React fragments like <React.Fragment> or with the shorthand <> (thankfully cool heads prevailed and <> reigned supreme and was codified with an ESLint rule).
These discussions can be mighty fun once in a while, but they aren't fun if they are repeated daily. Once we've come to a conclusion on one of these age-old debates, we should set it in stone by enforcing it with a lint rule so that we never have to discuss it again.
Not making your colleagues hate you
I spoke of my predilection for nitpicking at the start of this article and while a good nitpick here and there can be fun, pushing it beyond a point in terms of volume and triviality is both a losing battle and makes you insufferable to those on the receiving end.
Most nitpicks are genuinely in the name of good code, but next time you find yourself leaving one such comment on a pull request, instead of asking yourself "How could they not have noticed this?" instead ask "Is there an ESLint rule for this?".